
Photo composition: choose what your frame says
A photograph contains more than its subject. It also contains distances, edges, light areas, small distractions, and the space that explains where the moment happened. Photo composition is the decision about how those parts work together. You do not need to turn every picture into a technical exercise. Start by deciding what you want someone to notice, then compare a frame that preserves the setting with one that concentrates attention.
Cropping is useful because it makes that comparison concrete. You can see two versions rather than imagine an abstract rule. It also has limits: it cannot recover a hand that was outside the original photograph, create detail that was never recorded, or decide what a moment means to you. The following workflow uses CropBetter's actual exported files to explore those choices. The demonstration source images were generated as fixed testing material; the crop results were produced by this tool, with no generated content added during editing.
Start with a sentence, not a grid
Before moving an edge, describe the picture in a short sentence. It might be “the carved clock in this quiet room,” “my friend arriving at the station,” or “the tiny house below the mountain.” The words tell you what needs to survive a crop. If the room matters, a frame containing only the clock may lose the point. If the mountain explains the house's scale, removing the mountain does not simply make the photograph cleaner.
Now ask what competes with that sentence. A bright patch on the edge may draw your eye away from a face. A strip of empty ceiling may consume space without explaining the location. On another photograph, a large, quiet area may be exactly what makes the subject feel small or isolated. Try removing a distraction, but keep a version with the surrounding space so you can compare the effect.
Example one: a detail and its surroundings
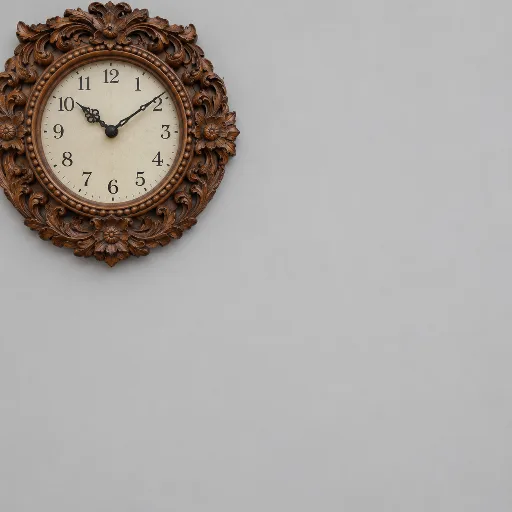
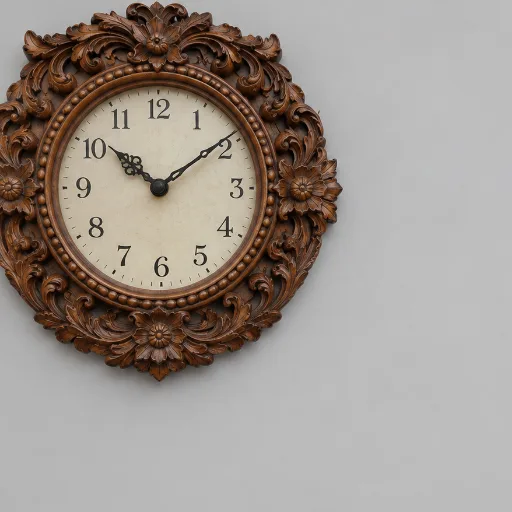
The first comparison begins with a clock close to the upper-left area of the photograph and a large amount of plain wall. The tighter export reduces the wall while keeping the clock in the frame. It changes the reading from a small object in a quiet setting to a closer look at the object itself. The ornamental carving becomes easier to inspect at the same display size.
That does not make the wider version useless. A designer might want its empty wall for a caption, and a person remembering a room might prefer the extra context. In CropBetter, A and B are independent drafts, each with a reason for its framing. Their roles depend on the analysis: A is not a permanent original-photo option, and B is not always a tighter crop. An unchanged frame can appear when the analysis supports keeping it.
Choose a photo, or use Edit to adjust it
Select, drop, or paste your photos into the photo cropping tool. You can review up to five photos in one free group. Local AI analysis starts automatically for the active photo, so there is no separate Analyze button to press before reviewing its proposals.
On first use, the browser downloads about 36.5 MB of analysis resources from this site. No uploads, no AI-generated images — your photo never leaves your device. Allow time for the files and analysis to finish, especially on a slower connection. The first result can take longer than later results, and the status message shows progress.
Read the reason under each available option, then click the result photo to keep that version. This confirms your choice and advances to the next photo awaiting review; it does not open the editor. Choose Keep both when you want both available versions. Do not choose a frame merely because it removes more of the photograph.
To change a proposal first, choose Edit A or Edit B. Drag the photo, adjust Zoom or Fine rotation, or change Aspect ratio; these actions edit that draft without confirming it. Choose Done editing · choose a photo to return to the comparison, then click the result photo you want to keep. You can return to a photo through its thumbnail to review your drafts and selection.
Use thirds as a comparison, not a verdict
A thirds grid divides a frame into three equal sections in each direction. Its intersections are useful places to try positioning a point of interest. The practical benefit is that it encourages you to compare a centered subject with one that has more space on one side. The grid is a prompt for looking, not a test that every successful photograph must pass.
For a person looking or moving toward one side, extra room in that direction can make the frame feel less cramped. For a centered doorway or a symmetrical reflection, forcing the subject away from the center can weaken the relationship between the two sides. Try turning the guide off after making your choice. If the photograph only feels convincing while the grid is visible, spend another moment looking at the actual picture.
The golden-section guides offer a slightly different comparison, placing lines at about 38.2% and 61.8% of the frame. CropBetter can compare thirds, golden-section placement, and centered framing when forming proposals. In the editor, open Composition guides to turn individual lines on or off. Neither a grid intersection nor a golden-section line proves that the crop is right: check whether it supports the subject and the remaining space.
Example two: keep a centered structure coherent
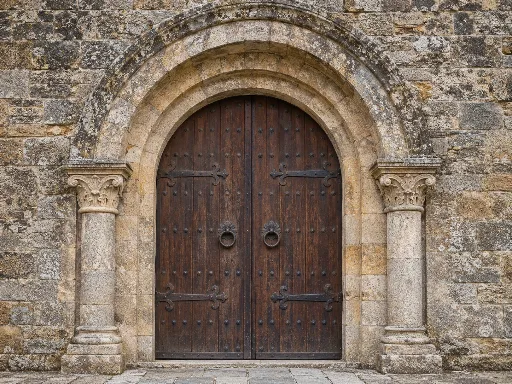
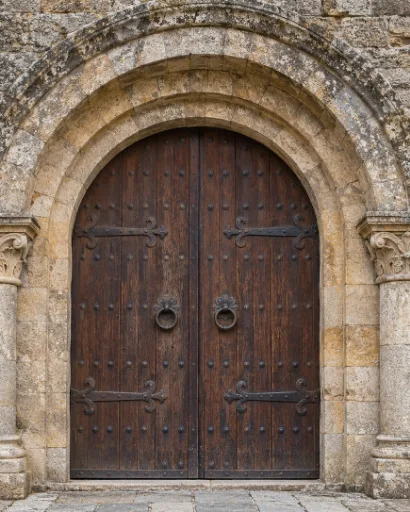
The second example uses a narrower portrait frame around a centered architectural subject. The aim is to preserve its central structure while trimming some of the surroundings. This is a different decision from moving a subject toward a thirds intersection. Examine how much of each side remains and whether the visible edges still explain the building.
If you need a square for a profile or post, you can crop an image into a square with that ratio already selected. Recheck the crop after changing shape: a border that worked in the original rectangle may cut through a detail in a square. Keep enough of the subject to make the choice look deliberate, especially around doorframes, hands, hair, and objects touching the edge.
Treat quiet space as part of the subject
Low-detail areas are not automatically mistakes. Sky, water, a wall, or a dark background may give a photograph its atmosphere. Removing all of that space can make the remaining subject feel crowded. Keeping too much can make the subject hard to find. Look at the picture at its likely viewing size, then ask how long it takes your eye to reach the part that matters.
CropBetter combines local scene classification and object detection with image structure, symmetry, and line checks. It can propose framing for people, objects, landscapes, and architecture, but it is not a general judge of photographic meaning. It does not understand a person's importance to you or reliably separate every patch of sky, water, and foliage. Strong background texture can still distract the analysis, so compare the actual results rather than treating a composition rule as proof.
When the analysis cannot support a safe proposal, the tool offers Adjust manually and Retry analysis rather than presenting the original as a verified AI result. You can also start manual editing while analysis is running. If an AI result arrives afterward, your edits remain in place; Use AI options instead is an explicit choice to replace those drafts with the proposals.
Check tilt and edges separately
First decide whether a long line is meant to be level. A sloping shoreline or an architectural perspective may be real, so an apparent tilt is a reason to look again rather than an instruction to rotate. CropBetter can include a small straightening rotation in a landscape proposal when its horizon evidence is sufficiently strong. It does not automatically level every diagonal line.
If the proposed level looks wrong, or no automatic correction is offered, choose Edit for that frame and use the horizontal reference with Fine rotation. The manual range is -15° to 15°, in 0.1° steps. Straightening uses some of the available image area; the crop must stay within the original photograph. Check the horizon and edges again after rotating.
Then inspect the four edges. Look for a hand cut at an awkward point, a bright fragment entering the frame, or a line that almost touches the border. A small move can improve an edge without making the whole crop dramatically tighter. If you need a screen-shaped frame, crop an image to 16:9 and repeat this edge check after the ratio changes. A wide format can remove more from a portrait than you expect.
Review a group without losing your decisions
With a group of photos, clicking an option's photo records your choice and moves to the next photo awaiting review. Keep both records both available versions and also continues the review. The thumbnails let you revisit a processed photo without losing its two drafts or selection. After revising a retained frame in Edit, return to the options and confirm the result again before exporting.
Once you have reviewed the group, export the kept frames. Multiple results arrive in one ZIP, and every frame remains a separate image. Check the dimensions shown in the export panel. Cropping removes pixels from the original; it cannot promise a larger print or a higher-resolution video thumbnail. PNG uses lossless encoding, while JPEG is encoded once at 92% quality. Rotation resamples pixels, and browser color handling may differ from the source profile.
A short final check
Look once more without the guides. Is the subject you named still clear? Does the remaining space support the moment? Do the edges look intentional? Is the output large enough for its destination? If both a wider and a tighter version serve a purpose, keep both. You can always make the final publishing decision in the context where the image will appear.
To try this process on your own photos, use the photo cropping tool. Upload, suggestions, editing, and export all stay at the same address. No uploads, no AI-generated images — your photo never leaves your device. Keep the tab open while you work, because photos and drafts are held in page memory rather than an online account.
Keep working if analysis is unavailable
After the tool has loaded, you can open a photo, adjust it manually, and export without an internet connection. If local AI cannot start, use Adjust manually; Retry analysis is available when you want to try again. A new AI session may still need to download its analysis resources online, so manual offline editing does not guarantee that AI analysis will work offline. Opening the site for the first time also requires a connection.
Further reading
- Adobe: the basics of photography composition explores composition principles and the role of cropping.
- Nikon: when to use thirds and when to break the rule provides another way to think about off-center framing.
- Fujifilm: using negative space looks at the relationship between subjects and the areas around them.